The proper management of your absence requests is an important step to ensure good communication with your establishment. Here is a guide to assist you in this process.
 Steps to fill out an absence request Steps to fill out an absence request |

Access the Absences module, then click on the New absence button;


You will be automatically redirected to the absence request.
The information related to your establishment and job will be displayed automatically. If you have multiple jobs or multiple establishments, please select the one for which you need to be absent using the drop-down menu.
If you need to be absent from different jobs, you will have to submit a separate absence declaration for each of them.


Below these fields is the switch labeled More than one absence justification.

You can declare an absence with a single justification or include multiple ones.
 Caution, if you fill in fields under the More than one absence justification toggle, you will still be able to activate or deactivate it — some of the information entered will be retained. Please validate the accuracy of the information if you modify the toggle.
Choose the option below that best fits your situation to proceed with the process.
- Choose the date of your absence as well as the hours, then click on Add this date. The date and time will be recorded;
- In case of an error, you can correct the entered date by clicking the pencil icon or delete it by clicking the trash icon;
- If you wish to enter more dates, select Add another date to enter a new time slot.

In this case, consult this article for more details: Employee - How to report an absence with multiple periods/days?

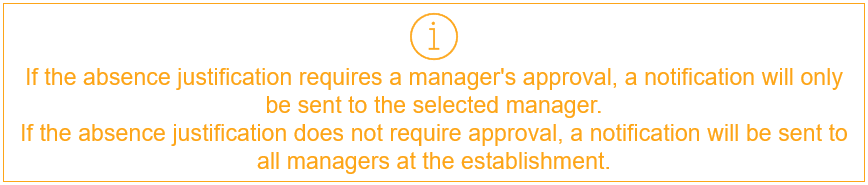
- You will then need to select your reason for absence in the Justification field using the drop-down menu. If your justification requires approval from a manager, a new field will appear, and you will need to select the manager via the drop-down menu;

If desired, here is a video providing more details about the Manager field: Employee - Why do I need to choose a manager in my absence declaration?

- If desired, enter one or more email addresses in the Other emails field to notify others of your absence, such as your colleagues (administrative staff will be notified by default).
- If necessary, include a supporting document;

For more details on managing supporting documents, consult this article: Employee - How to manage the supporting document?
- Enter an internal note if necessary, then click Continue.

The absence declaration with different justifications allows you to submit a single absence, which will enable you to find one substitute for all your periods, based on your organization’s call order.
- Toggle the switch for More than one absence justification: the interface will change. In the table, select the date and time for your absence related to the first justification. If necessary, choose the manager who will approve this period and include a supporting document if required.

- Add a second absence period by clicking on Add a date. Select the date and time, as well as the justification related to this period. Once again, choose the manager who will approve this second period, and include a supporting document if necessary.

If desired, here is a video providing more details about the Manager field: Employee - Why do I need to choose a manager in my absence declaration?.

For more details on managing the supporting document, refer to this article: Employee - How to manage the supporting document?.
- Repeat the date entry for each period that requires a different absence justification: there is no limit to the number of absence periods or the number of different justifications.
Note that if there's an error with the period, you can delete the entered information by clicking the trash icon next to the relevant period. You can also view uploaded supporting documents by clicking the paperclip icon: in the page that opens, you will be able to delete them by clicking the trash icon.

- If desired, enter one or more email addresses in the Other emails field to notify others of your full-day absence: for example, your colleagues (administrative staff will be notified by default);
- Enter an internal note if necessary, then click Continue.


After completing the absence declaration form, you will automatically be redirected to the replacement request form.
 | The blue highlight indicates which section of the request you are currently in. |
 | Green indicates that your absence declaration is complete. |
 | Red indicates that required information is missing. |
Indicate your replacement needs, then click Submit.

To find out the procedure for completing the replacement request form, consult this article: Employee - How to fill out the replacement request?

To learn more, this explanatory video can guide you step by step in declaring your absence: Video: Employee - How to declare an absence?
 Can I make changes to an already submitted absence declaration? Can I make changes to an already submitted absence declaration? |
Depending on the status of your absence request, you may be able to make changes to it.
However, please note that the selected dates and times cannot be modified. In this case, you must cancel your request and create a new one.
See what can be modified based on your absence request status:
 | You can modify the justification and the manager. You can also add or remove supporting documents and add internal notes. |
 | You can modify the justification and the manager. You can also add or remove supporting documents and add internal notes. |
 | You can add or remove supporting documents and add internal notes. |
 | You can only add internal notes. |
 | You can only add internal notes. |
 | You can only add internal notes. |
 | You can only add internal notes. |
 Canceling an absence request Canceling an absence request |
Regardless of the status, it is possible to cancel a request. However, other conditions may prevent cancellation.
 | For more information, please refer to this detailed article: Employee - How to cancel an absence request and/or a replacement request? |
| Declaring an absence using accumulated time |
If your organization uses the Time banks module and you have accumulated hours in it, you can use them when declaring an absence. This allows you to avoid dipping into your sick leave or another leave bank.
 | To learn more about the procedure to follow, please refer to this article: How to declare an absence and debit a time bank? |
Was this article helpful?
That’s Great!
Thank you for your feedback
Sorry! We couldn't be helpful
Thank you for your feedback
Feedback sent
We appreciate your effort and will try to fix the article